Veterinary sonography machines, commonly known as ultrasound machines, have become an indispensable tool in modern animal care. These devices are used to visualize internal organs and tissues, aiding in the diagnosis and monitoring of various conditions in animals. For newcomers to veterinary medicine or livestock care, understanding how to properly use and interpret sonography images is essential for improving animal health outcomes.

What is Veterinary Sonography?
Veterinary sonography is a non-invasive diagnostic technique that uses high-frequency sound waves to create images of the internal structures of an animal’s body. The principle behind this technology is similar to how echolocation works in animals like bats. The ultrasound waves are emitted from a probe that is placed on the animal’s body, and these waves bounce off organs and tissues, creating an image based on the reflection. The resulting image helps veterinarians and farmers identify abnormalities, monitor organ function, and even determine pregnancy in animals such as cows, Chevaux, and sheep.
Applications of Veterinary Sonography
Ultrasound technology in veterinary medicine can be applied to various species, from livestock and companion animals to exotic species. Here are some of the most common applications:
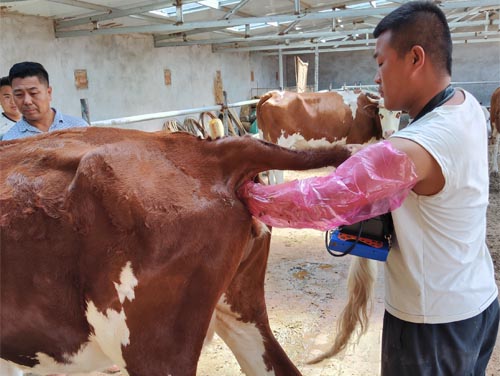
1. Diagnostic de grossesse
In large animal practices, such as those involving cattle, Chevaux, and sheep, ultrasound machines are vital for confirming pregnancy. Early detection of pregnancy can help farmers make better decisions regarding breeding, nutrition, and the timing of veterinary interventions.
For instance, in dairy cattle, ultrasound is frequently used to check for pregnancy and evaluate the number of fetuses present. This allows for better management of reproductive cycles, ensuring the highest possible productivity from the herd.
2. Abdominal Organ Examination
Veterinary sonography is often used to examine abdominal organs such as the liver, Reins, bladder, et les intestins. In cases of gastrointestinal issues, Infections, or cancers, ultrasound can help determine the size, forme, and texture of organs, which can be crucial for diagnosis.
In livestock, ultrasound machines can also be used to assess the condition of muscles, bones, and joints, especially in performance horses and working animals. This makes the technology invaluable for injury prevention and treatment.
3. Imagerie cardiaque
Just like in human medicine, ultrasound is used in veterinary cardiology to assess the heart’s condition. The imaging can provide important data regarding the size of the heart chambers, the heart’s pumping function, and the presence of any abnormalities such as heart murmurs or valve diseases. This is particularly useful for diagnosing heart diseases in dogs, Chevaux, and other companion animals.
4. Guided Biopsy
Veterinary sonography machines also serve as a guide for procedures such as biopsy. By visualizing the targeted organ or mass in real-time, veterinarians can safely and accurately collect tissue samples for further examination, minimizing the risk of damaging surrounding tissues.
5. Fluid Detection and Abscess Identification
Ultrasound is highly effective in detecting abnormal fluid accumulation in the body, such as in the abdomen or chest. This is especially important in cases of infection, abcès, or conditions like ascites (fluid in the abdominal cavity). The ability to locate and assess these fluid-filled areas can be a lifesaver in emergency situations.
How Does Veterinary Sonography Work?
1. The Equipment
A typical échographie vétérinaire machine consists of the following main components:
-
Transducer Probe: The probe sends out high-frequency sound waves and receives the reflected waves. It is typically placed on the animal’s body, often with a gel to improve sound wave transmission.
-
Control Panel: This allows the operator to adjust settings such as frequency, profondeur, and focus of the ultrasound. The control panel is where images are processed and displayed on a screen.
-
Monitor: The monitor displays the images that are captured by the ultrasound machine.
-
Printer (optional): In some cases, the system may be connected to a printer to create hard copies of the images for the veterinary records.
2. How the Sound Waves Work
The transducer emits sound waves at a frequency that is too high for the human ear to hear. As these waves pass through the body, they are reflected back by different tissues at different rates. Dense tissues like bones reflect most of the sound waves, while softer tissues like muscles and organs reflect fewer waves. The machine processes these reflections to create an image on the monitor, giving the veterinary professional a detailed view of what’s happening inside the animal’s body.
3. Choosing the Right Frequency
Different types of tissues and organs require different frequencies for optimal imaging. Lower frequencies provide deeper penetration and are used for larger animals or when imaging deeper organs, while higher frequencies offer greater detail but have less penetration. It’s essential to select the right frequency based on the size of the animal and the organ being imaged.

How to Use a Veterinary Sonography Machine
For beginners, here are some steps to guide you in using a veterinary sonography machine:
1. Prepare the Animal
Ensure the animal is calm and in the correct position for the procedure. You may need to restrain them gently or sedate them if necessary, depending on the animal’s temperament and the area being scanned.
2. Apply Conductive Gel
Before placing the transducer on the animal’s skin, apply a generous amount of conductive gel. This gel helps transmit the sound waves efficiently and improves the quality of the images produced.
3. Position the Transducer
Place the transducer on the area you wish to examine. Move the probe around gently to get different angles and improve image clarity. You may need to apply slight pressure to get a clearer image.
4. Monitor the Images
As you scan, monitor the images on the screen. You can adjust settings on the control panel to improve image resolution, profondeur, and focus as needed. It is important to be patient, as obtaining clear images can take time.
5. Interpret the Results
Once you have gathered the necessary images, interpret the findings based on the anatomy and possible abnormalities. This step is crucial for accurate diagnosis and treatment planning.

Tips for Beginners
-
Practice Makes Perfect: Familiarity with the equipment and techniques comes with practice. Start by scanning animals with straightforward conditions and gradually work your way up to more complex cases.
-
Stay Calm: Some animals may be stressed or anxious during the procedure. Maintaining a calm demeanor and handling the animal gently will improve the success of the ultrasound.
-
Consult Experienced Veterinarians: If you’re new to sonography, always consult with experienced veterinarians for advice on technique and interpretation. They can provide valuable guidance and help you avoid common mistakes.

Conclusion
Veterinary sonography machines have revolutionized the way we diagnose and treat animals, offering a non-invasive, efficient, and accurate means of assessing internal health. While learning to use ultrasound equipment can be challenging for beginners, with the right training, practice, and experience, it becomes an invaluable tool for veterinarians, farmers, and livestock caretakers alike. By understanding how these machines work and how to interpret their results, you can improve the health and well-being of animals under your care.